Printer & Cash Drawer
Heksia POS supports receipt printers and cash drawers to make checkout fast, simple, and reliable.
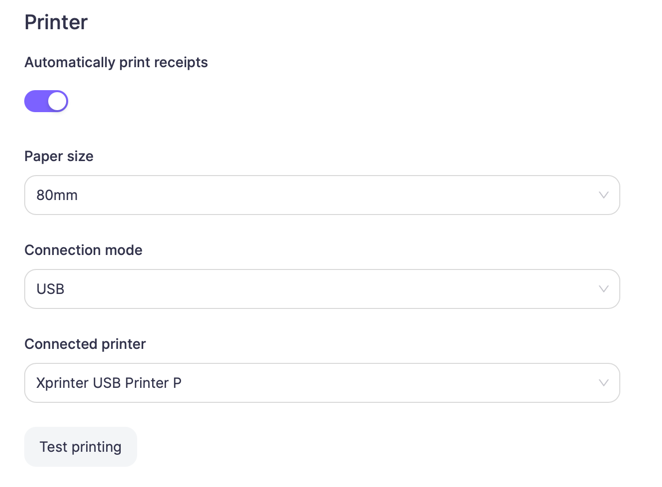
Printer settings
To connect and configure a receipt printer, go to:
Settings → Printer
Here you can manage all printer-related options.
Automatically print receipts
Enable Automatically print receipts to print receipts automatically after each completed sale.
- When enabled, the receipt is printed immediately after checkout
- When disabled, receipts can be printed manually
Paper size
Select the paper width used by your receipt printer:
- 58 mm
- 80 mm
Make sure the selected paper size matches the physical paper roll in the printer to avoid formatting issues.
Connection mode
Heksia POS supports two printer connection types:
USB
Use this option when the printer is connected directly to the device via USB.
- Select USB as the connection mode
- Choose the printer from the Connected printer dropdown list
TCP / Ethernet
Use this option for network printers connected via LAN or Wi-Fi.
- Select TCP / Ethernet
- Enter the printer’s IP address in the TCP address field
Example:192.168.1.50
Ensure the printer is on the same network as the POS device.
Test printing
Use the Test printing button to verify that the printer is set up correctly.
- Prints a test receipt
- Confirms connection, paper size, and printer responsiveness
It is recommended to run a test print after any configuration change.
Cash drawer (Money box)
Cash drawers are supported via the receipt printer.
- The cash drawer is typically connected directly to the printer using an RJ-11 or RJ-12 cable
- Heksia POS sends an open-drawer command through the printer
When the cash drawer opens
Automatically opens when a cash payment is completed
In most cases, no additional setup is required — as long as:
- The printer supports a cash drawer
- The cash drawer is physically connected to the printer
Recommended setup steps
- Connect the printer (USB or Network)
- Load the correct paper size (58 mm or 80 mm)
- Open Settings → Printer
- Configure paper size and connection mode
- Run Test printing
- Enable Automatically print receipts
- Save the settings
- Connect the cash drawer to the printer (if used)
Your POS setup is now ready for daily operations with automatic receipt printing and cash drawer support.